Weed Eater Head Not Spinning – It Might be A Broken Drive Shaft
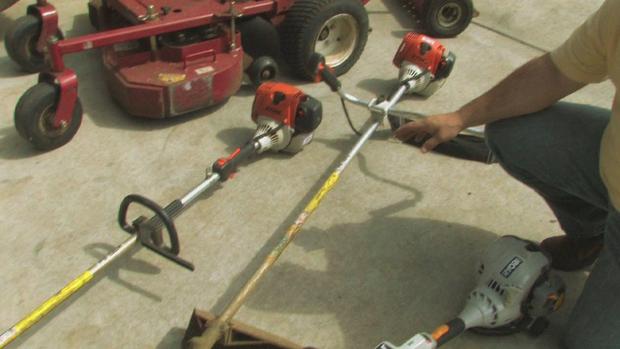
It’s frustrating when you need to use your gas string trimmer and the head will not turn.
Most every string trimmer uses a centrifugal clutch that unfastens the engine flywheel from its drive shaft when you turn off the motor. When the clutch springs eventually wear out, the clutch is not going to retract when the drive shaft stops spinning. This can lead to excessive clutch wear.
After enough wear, the clutch will begin to slip. This is when you really begin to notice problems because the the head is not going to spin in any way. If this ends up being your problem, you’ll need to decide if you want to replace the clutch – or the whole weed eater. If it is an older model, you are problem better off to replace the tool with a new string trimmer.
Quick Fixes
Before breaking out your pocketbook for pricey repairs or a brand new tool, it’s first worth checking to see if you are having any of these problems.
First, you might have gathered enough weeds and other debris over the years that’s it’s wrapped so tightly around the eater head it can’t move. To check, you’ll want to pop the head off of the tool and cut off any organic or other material that has built up on the shaft.
Another possibility is that there is something stopping the engine from powering up enough to spin the eater head. This may well be due to the air filter or spark arrestor being blocked. Each of the parts is easily replaced. Your owners manual will have the exact location of these parts on your tool. Usually it includes directions for replacing them as well.
Drive Shaft Breaks Down
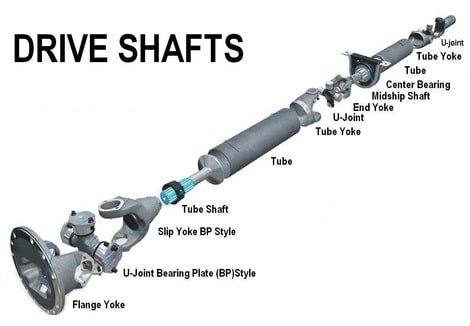
The drive shaft of most straight and every curved-shaft Weed Eater trimmer is a supple rod that hooks the motor up with the trimmer head. This rod that can break. When this happens the only option is to get it replaced. There is a centrifugal clutch that hooks the drive shaft up with the motor. This clutch retracts whenever the motor isn’t operative, but on the engine accelerating, centrifugal force shifts it downward the engine crankshaft till it gets engaged with drive shaft. Sometime the clutch sticks in the inoperative position, which is typically due to the buildup of dirt and wearof the engine housing.
The Steps to Follow for Servicing the Drive Shaft or Clutch Are Given below
- While these directions should work for most weed eaters, each model is slightly different. You’ll need to improvise to make these directions work with your own model. The owners manual will be a big help in this regard. If there is a conflict between our directions and what your owners manual says – go with your manual. It’s made for your specific situation.
Step 1
Put the trimmer on a surface that is flat, and allow the engine to cool down for a period of 10 – 15 minutes so you don’t burn yourself. Make sure the engine can’t accidentally start again . Removing the spark plug wire is the easiest way to immobilize the engine.
Step 2
Remove the screws that hold the handle housing to drive shaft by using a screwdriver, force open the couple of parts of the handle and slot out the throttle lever from handle. Try and drag the throttle cable from the lever by the use of needle-nose pliers, and follow this up by removing the handle housing.
Step 3
Unscrew the screw the juncture where the drive shaft and the engine housing meet. Drag the drive shaft and free it from engine housing.
Step 4
The next thing to be done is unscrewing the clutch cover of plastic from the face of the engine housing. This should reveal the clutch assembly.
Step 5
Unscrew the bolt that holds the clutch housing and the engine crankshaft together by the use of a socket wrench. Drag this thing off for revealing the clutch plate. Unbolt the screws that hold the clutch plate and the flywheel together and do away with it. Substitute the plate as well as the housing.
Step 6
Assemble the new clutch by reversing the directions you used for removing the broken one. Once the clutch is secure, put back the clutch lid, put the drive shaft back in place and make certain that it seats appropriately. Follow this up by replacing the retaining screw. Attach the throttle cable to throttle lever, hook the lever up with the drive shaft and substitute the handle housing.
Things That You Are Going to Require
- Needle-nose pliers
- Screwdriver
- Socket wrench
- Paitence – don’t try this without it
Bottom Line
You could require needle-nose pliers for extracting the drive shaft from shaft housing. It has a plastic coating – even on the wound metallic part -so when it breaks it is going to come out in a single piece. Seek advice from our website, any repair service online or a neighboring outlet for the appropriate substitution for the model you own.